Script: Particles Plugin
Documentation · Particles Plugin v1
Particles Plugin v1 script in Marketplace.
Thank you for having considered this script to enhance the quality of your products. Please read the following instructions carefully, especially the ones explaining which permissions to apply to the scripts for the next owner. Failure to complete this task INVALIDATES the license governing your use of this set of scripts. Should you have problems, please fill the scripts assistance form, explaining what you did and what happened, and I'll get back to you.
IMPORTANT! The script contains a check to prevent accidental give-aways. If you haven't set permissions correctly in your inventory, then the script will self delete when you try to use it. The best way to ensure you set permissions correctly is by doing it NOW in your inventory.
Follow these directions carefully. Complete the Step by Step Guide in the first place and then go to the Advanced Setup section for a detailed explanation of all the features. There's a Troubleshooting section at the end. Before asking for help, check that your problem isn't one of the problems described in there.
License of Use: Click here to read the License of use.
What's included in your purchase
Check that your box contains the following assets:
- [Black Tulip] Particles Plugin v.1
- [Black Tulip] Particles Plugin ~CFG~
- [Black Tulip] Particles Plugin ~DOC~
- [Black Tulip] Proof Of Purchase - Particles Plugin v1
and these sample assets, necessary to follow the step-by-step guide:
- [Black Tulip] Particles Plugin - Start Here
- [Black Tulip] Particles Plugin - Finished Sample
- [Black Tulip] Sparks #1
- [Black Tulip] Sparks #2
- [Black Tulip] Sparks #3
- [Black Tulip] Sparks #4
If any of these is missing, contact Auryn Beorn for a replacement. Keep in mind that sample assets are never provided in full perms state. They're included to illustrate how to use the script. An exception is made in this case for the textures. Please use them under our textures license.
Features list
- Starts/Stops the particles effect when decided in another script (AVsitter, another third party script with ability to send linked messages)
- Particles are independent of avatars sitting
- Texture can be one, or a sequence/random choice from a list of textures
- Radius can be static or random
- Starting color can be static or random
- End color can be static or random
Step by Step Guide
The configuration notecard has already set up a snow particles effect, so we're going to make this step by step guide as short and simple as possible. Let's rez the sample object [Black Tulip] Particles Plugin - Start Here
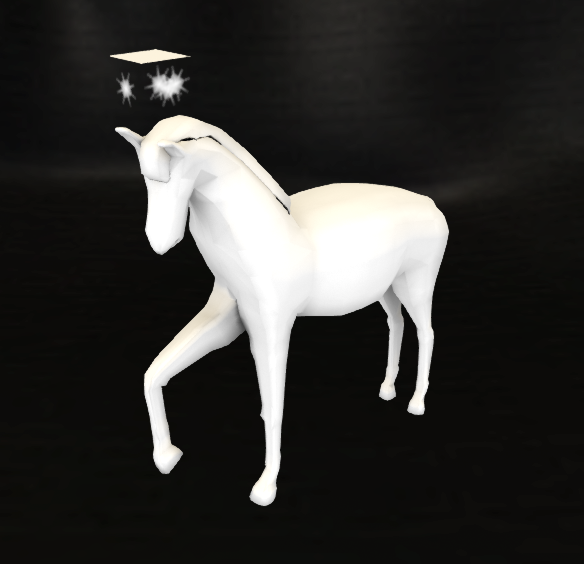
First we observe the item. It's a horse with a box over its head. The head has four faces textured with different sparks. These are the sparks we'll be using as particle textures in our setup. Why are they there? Because this preloads the particles, so when they start to be actually emitted, they won't show first as a gray texture since they're already loaded on those faces. When the item is finished, we will turn the transparency of that box to 100% but while we work with it, we keep the transparency of the box at 0% so we can select it, etc.
This said, let's think in what we want to achieve from this horse with a box over its head:
- We want that one particles effect emits from one or more than one prim.
- We want to turn on/off this effect from another script such as AVsitter or any other that works with linked messages. This sample horse is prepared with AVsitter.
- We may want that the texture is emitted randomly every number of seconds.
- We may want that the radius of the emission changes randomly this same every number of seconds.
- We may want that the starting color, the ending color, or both, change randomly this same every number of seconds.
The first point is telling us one thing: some prims are special, and they need to be recognized by the script, somehow. This somehow will be by writing things in the corresponding prim description (don't confuse it with the prim name).
These things will be a keyword followed immediately by a number. We'll see how and why the number, because it's also related with a value in the notecard. For example:
particles0is a valid description, and:
particles1
is a valid description too. We use the particles keyword followed by a number. This number is important. It can be a number from 0 to 300. It's recommended to use 0, and the following ones only in the case that will be described in the advanced section.
Which is the special prim in this case? The prim where we want particles emitting. In this example case, that would be the box over the horse's head. So we write particles0 in the box's description.

Now... What?
Now we make sure that the addToCode parameter of the notecard has exactly the same value as number we've written after the particles word, a 0 in this case:

So far, we've set up the following:
- Description of prim from where particles will emit
- Notecard addToCode parameter
The rest of the parameters are set up in the notecard, to help things being simple in this first time using the script. Let's continue.
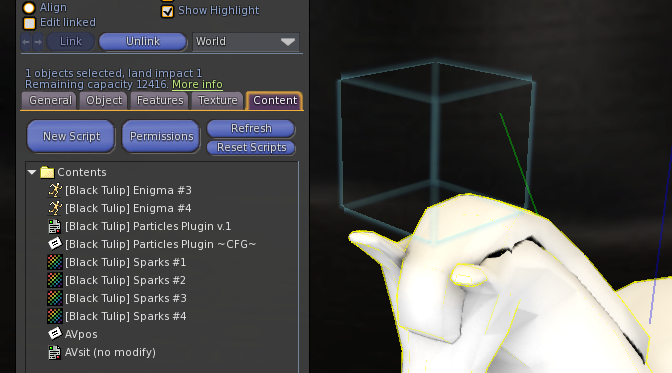
IMPORTANT POINT: If a prim will emit particles, then it must contain the particle textures that will be used. In our example, this means that we change permissions for next owner to the samples included ([Black Tulip] Sparks #1 to [Black Tulip] Sparks #4) and, to begin with, we drop them in the contents of the box prim:

Now we can turn the transparency of this prim up to 100%:

The particle textures must go somewhere else. They must go in the prim that will contain the script, the horse in our case, which starts having the AVsitter script and a couple of poses:

and we add the textures in here too, with the permissions correctly set:

There's one line we have to add to the AVpos notecard. We have to include a BUTTON line so it will send a message to the particles plugin. Make sure that your AVpos notecard looks like this one:

The link message code is -31450100. If you're working with other third party scripts that use linked messages, you will need this code at some point. Check the documentation of said script or talk to the scripter making your script for more information. Your scripter also needs to know that this code may vary in the range from -31450100 to -31450400. Details will be given in the advanced setup section.
Now drop the [Black Tulip] Particles Plugin ~CFG~ configuration notecard. Then change permissions for next owner of the [Black Tulip] Particles Plugin v.1 script, and drop it in too.
The script starts reading the configuration notecard. Once it's done, your particles plugin is ready to go! The way this object is set up, we need to sit on the horse and select the "Particles" option to start/stop them.

Notice that if we stand up from the object when particles are up, they won't stop working. They only stop if we sit and click again on the Particles button.
We discuss in the next section all the related notes about the advanced setup, including technical details for a third party scripter. Read those notes carefully.
There's a finished fireplace included so you can compare with your own setup, in case you run into trouble. It's the [Black Tulip] Particles Plugin - Finished Sample object.
Advanced Setup
The advanced setup of this script involves the following:
- Learning how to make the script work together with other of Black Tulip's scripts (Description Format)
- Learning the parameter addToCode of the configuration notecard, which allows us to use more than one copy of this script, for other effects, in different prims (Notecard Configuration in Detail)
- Learning important details about the particles setup (Notecard Configuration in Detail)
Description Format
This script is compatible with other scripts from Black Tulip. In order to have them all working together, simply separate the description tokens with the # character.
Notecard Configuration in Detail
The addToCode parameter.
When we want that one or several prims emit the SAME particles, we just need ONE copy of the script in one of the prims, and naming the related prims particles0, as we've made in the step by step guide.
We may want to use this script to have TWO or more DIFFERENT effects in different prims. How do we proceed?
The first thing, for our own clarity, is deciding which is effect 0 and write particles0 in the description of all the involved prims, deciding which is effect 1 and write particles1 in the description of all the involved prims, deciding which is effect 2 and write particles2 in the description of all the involved prims... and so on, until a maximum of 300. The highest number you could type is particles300.
All the prims with particles0 in the description need of just ONE script that can be placed in whichever prim we want, with its corresponding configuration notecard. In our sample we've placed it on the root. That is fine. We could have placed it on the box with the sparks. That would have been okay too. What we cannot do is placing two copies of the script in the SAME prim. One script with its configuration notecard must be in a different prim than another script with its configuration notecard.
When we want to add a second effect, we go for particles1 in the description and we drop ONE copy of the script with its configuration notecard in a prim with no other copy of this same particles plugin script.
And now, this is the relationship to keep in mind. The particles0 description is associated to addToCode = 0 in its corresponding notecard, AND the linked message must send a -(31450100 + addToCode) code number (simply -31450100 in this case).
The particles1 description is associated to addToCode = 1 in its corresponding notecard, AND the linked message must send a -(31450100 + 1) code number (so, -31450101 in this case).
The particles2 description is associated to addToCode = 2 in its corresponding notecard, AND the linked message must send a -(31450100 + 2) code number (so, -31450102 in this case).
And so on. Consult with your scripter if you don't know what this means or how to work with it.
This is all about how to set up more than one particles effect with this script. Each particles effect would be turned on/off separately unless your scripter makes them work all together by starting/stopping them all together. There are still a couple more of details of this advanced setup.
Important details about the particles setup (how to use textures)
This script allows us to emit a different texture every N seconds. We indicate that in two steps. First, in this line:
timeForEffectChange = 5
This would mean that, if activated, one or the two particle effects would emit a different texture every 5 seconds. Now, where do we say if this is activated, and how do we add more than one texture name to one particle effect?
Notice this line:
pTexturesMode = 0
When set to 0, it means that no different textures are emitted. We set that value to 1 to say "emit different textures, in the order I write them". We set that value to 2 to say "emit these different textures randomly". This last option may be the one you prefer in case you use the feature.
How do we specify these different textures? Typing one:
pTexture =
line per texture (after the = sign we would write the texture name). Notice that the second effect has similar parameters, but named with the starting p2 name.
IMPORTANT: If you plan on using a particles emitter that is not the root prim (most likely case), then you must drop the texture in the prim with the script and in the emitter prim, like we've done in the step by step example. If you don't do this, you will see the default texture, a circle.
Observe that there's a similar parameter for the radius of the particles effect:
pRadiusMode = 0
While it's set to 0, the radius is static, but if we change this to 1, the radius will randomly change from 0 to the radius value we've set using the same timing than the textures.
Similarly, we can also make the starting and end colors to be random. We achieve this by changing the value of:
pStartColorMode = 1
pEndColorMode = 0
to 0 or 1 depending on if we want it static or random.
Important note about randomizing colors: If your starting color is <1,1,1> and you've decided you want random starting colors, then you'll have one of every possible color appearing each time. But if your starting color is <1,0,0>, then the random colors will be only shades of red.
In other words, if your starting color is <x,y,z> and you decide to have random colors, then each color is calculated at random this way: <llFrand(x), llFrand(y), llFrand(z)>. That's why having a random value for <1,0,0> would create shades of red, while <0,1,0> would do for green, <1,1,0> would go into different mixes of red and green, etc.
You can change parameters like the color, the size, the transparency... We're not going to explain particles here, but we invite you to explore our books on the topic at Marketplace:
Important: If your objects aren't designed so the center of the bounding box coincides with the place where you want particles to emit, you will need to add an extra prim that will contain the particles texture and where the particles script will be dropped. The sample object has not the bounding box correctly set for the particles placement, showing that way how to use an extra prim.
Important: The timeForEffectChange value is the same for textures, radius, and colors. When timeForEffectChange seconds pass, a new texture will be selected (if textures are set as other than static), a new radius will be calculated (if random), and new starting and end colors will be calculated (if random, for each of them.)
Troubleshooting
Q: I've set textures in the configuration notecard, but instead I keep seeing circles. What can be done to fix this?
A: Remember this note from the documentation.
IMPORTANT: If you plan on using a particles emitter that is not the root prim (most likely case), then you must drop the texture in the prim with the script and in the emitter prim. If you don't do this, you will see the default texture, a circle.
If after having followed the directions and checked the troubleshooting list, you have problems making the script work, please click here for the customer service form.